
By RenoWorks Hampshire · Published 28/10/2026
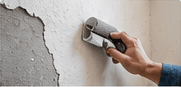
Inspect before disturbing the surface
Start with a bright portable light and examine each wall from an angle. Mark dents, glossy patches, lifted wallpaper seams and stains with small pieces of removable tape. Check the ceiling junction and behind furniture too. Stop before sanding or scraping unknown older coatings or textured finishes: lead or asbestos may require specialist assessment. Damp patches and growing cracks also need their cause investigated before cosmetic work.
Protect the room and clean deliberately
Move loose belongings out and cover flooring with secure, suitable protection. Leave yourself a clear route to the door. Wash ordinary washable paintwork with the cleaner recommended for the surface, paying attention to greasy cooking areas and hand marks beside switches. Keep liquid away from electrical accessories. Rinse if the cleaner requires it and allow the wall to dry; paint cannot reliably bond through cleaner residue.
Repair the defects that remain
On surfaces confirmed safe to prepare, remove only unsound material and use an interior filler suited to the repair depth and background. Several controlled applications can be easier to finish than one thick mound. Let the repair dry throughout before levelling it. A wall covered with loose, hollow or crumbling plaster needs a plasterer's assessment rather than a skim of filler disguising the problem.
Give each background the right treatment
A repaired patch, bare plaster and intact old emulsion do not absorb paint identically. Follow the chosen paint system's directions for sealing or priming each area; there is no universal dilution recipe for new plaster. New plaster must be dry enough for the specified system. Do not use general building adhesive as a substitute for a recommended paint primer. Test uncertain compatibility on a discreet area first.
Make a final preparation check
Remove preparation dust with a suitable method, then inspect again with the light low across the wall. Run a hand gently over safe, clean repairs to find ridges your eyes missed. Check that protection is secure, tools are clean and primer has reached its stated recoating time. Photograph the prepared surface if someone else will paint it, so the agreed starting condition is clear.
- Clean, dry and sound background
- Repairs level with the surrounding wall
- Correct primer where the paint system requires it
- Enough time for drying between stages
Related questions
Can I paint straight over wallpaper paste?
Residual paste can interfere with the new coating. Remove it using an appropriate method for the wall and allow everything to dry. If residue remains or the background is fragile, ask a decorator to specify a compatible treatment.
Must every previously painted wall be sanded?
No. Preparation depends on condition, sheen and the new paint system. Avoid unnecessary abrasion, particularly where the coating history is unknown. The aim is a sound, clean, compatible surface.
Further reading
Prefer help with the project?
Tell us about the work and your property in Hampshire or West Sussex.
ASK FOR A QUOTE